Sous Vide Temperature Guide — Pasteurization, Protein Denaturation, and Safety Tables
Comprehensive sous vide reference covering pasteurization time-temperature data, protein denaturation thresholds, doneness tables for beef, pork, poultry, fish, eggs, and vegetables with exact temperatures.
What Do You Actually Need to Know About Sous Vide Temperature Guide?
What are the common mistakes, the precise measurements, and the science-backed techniques that separate reliable results from guesswork? This guide provides the reference tables, ratio calculations, and decision frameworks for sous vide temperature guide — organized for quick lookup and practical application.
The Core Principle: Time Compensates for Temperature
Pasteurization is not a single temperature — it is a time-temperature relationship. A chicken breast held at 60°C for 90 minutes is exactly as safe as one cooked to 74°C instantly. Both achieve a 7-log₁₀ reduction of Salmonella (reducing a population of 10 million to 1). Sous vide exploits this relationship to cook food at lower temperatures for longer times, producing textures impossible with conventional methods while meeting identical safety standards.
This is the foundational concept. Every table below derives from USDA and FDA time-temperature pathogen reduction data, applied to specific proteins.
Protein Denaturation — What Happens at Each Temperature
Meat is primarily composed of three proteins that denature at different temperatures. Understanding these thresholds explains why 1°C changes in sous vide produce noticeably different textures.
| Protein | Denaturation Onset | Full Denaturation | % of Muscle Protein | Effect When Denatured |
|---|---|---|---|---|
| Myosin | 50°C | 55°C | 55% | Meat firms slightly, becomes opaque. This is the “medium-rare” transition. Desirable. |
| Collagen | 55°C (shrinks) | 68°C (converts to gelatin over time) | 2-15% (cut-dependent) | Connective tissue softens. Below 68°C, collagen shrinks but does not dissolve — long cooks required. |
| Actin | 66°C | 73°C | 20% | Muscle fibers contract sharply, expelling moisture. This is why well-done meat is dry. |
The goal in most sous vide cooking: fully denature myosin (for firmness and opacity) while keeping actin intact (to retain moisture). This means cooking between 55-65°C for most red meats. Once you cross 66°C, actin denaturation begins and moisture loss accelerates — the same physics governing all protein thermal behavior.
Chicken Breast Pasteurization Table
Chicken is the highest-stakes sous vide protein because of Salmonella prevalence. These times achieve a 7-log₁₀ reduction for a chicken breast up to 70mm thick, measured from when the core reaches the target temperature (not from when you set the circulator).
| Core Temperature | Time at Temp for 7-log Reduction | Total Cook Time (25mm breast) | Total Cook Time (50mm breast) | Texture |
|---|---|---|---|---|
| 58°C | 122 minutes | 152 min | 197 min | Very soft, almost custard-like. Some find this too soft. |
| 60°C | 54 minutes | 84 min | 129 min | Tender, juicy, slightly pink. Restaurant quality. |
| 63°C | 17 minutes | 47 min | 92 min | Firm but succulent, no pink. Best all-purpose setting. |
| 66°C | 5.5 minutes | 35 min | 80 min | Traditional texture, noticeably drier than 63°C |
| 70°C | 1.5 minutes | 31 min | 76 min | Familiar home-cooked texture, moderate dryness |
| 74°C | Instant (< 15 sec) | 28 min | 73 min | USDA instant-kill temperature. Dry, fibrous. Unnecessary with time-at-temp method. |
The 63°C for 47 minutes setting (25mm breast) is the recommendation for most people. It produces chicken that is unambiguously safe, with no pink color that might concern guests, while retaining 18% more moisture than the traditional 74°C instant-kill approach.
Total cook times include the heat penetration period — the time for the core to reach the water bath temperature from a 5°C refrigerated starting point.
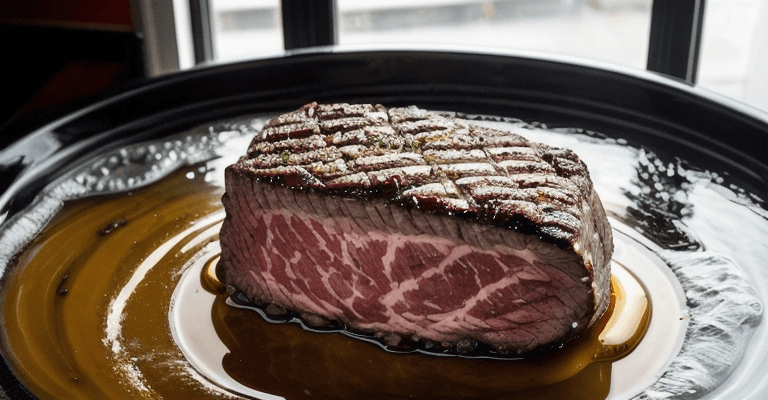
Beef Doneness Table
Beef sous vide is straightforward because Salmonella and E. coli are surface contaminants on intact cuts (not ground beef). For whole-muscle cuts, searing the exterior after sous vide handles surface pathogens. Interior temps below 55°C are safe for intact steaks.
| Doneness | Temperature | Time Range (25-50mm steak) | Myosin State | Actin State | Moisture Retention | Color |
|---|---|---|---|---|---|---|
| Rare | 52°C | 1-3 hours | Partially denatured | Intact | 92% | Bright red, cool center |
| Medium-rare | 55°C | 1-4 hours | Fully denatured | Intact | 88% | Pink-red, warm throughout |
| Medium | 58°C | 1-4 hours | Fully denatured | Intact | 84% | Pink, firm |
| Medium-well | 63°C | 1-3 hours | Fully denatured | Partially denatured | 76% | Faint pink, noticeably firmer |
| Well-done | 68°C | 1-2 hours | Fully denatured | Mostly denatured | 68% | Gray-brown, dry |
| Braised texture (chuck, short rib) | 74°C | 24-36 hours | Fully denatured | Fully denatured | 60% (but gelatin compensates) | Gray, falls apart |
For tough cuts (chuck, short rib, brisket): cook at 68-74°C for 24-48 hours. The extended time converts collagen to gelatin at these temperatures. The result is meat with the tenderness of a traditional braise but the medium-rare color and texture of a steak — something conventional cooking cannot achieve.
Time upper limits matter. A steak held at 55°C for more than 4 hours develops a mushy texture as enzymes (calpains and cathepsins) break down muscle structure excessively. For standard steaks, 1-2 hours is optimal.
Pork Safety — Trichinae and Pasteurization
The traditional “cook pork to 71°C” advice was driven by Trichinella spiralis fear. Modern USDA data shows trichinae are killed at much lower temperatures given sufficient time.
| Temperature | Time to Kill Trichinae | Time for 7-log Salmonella Reduction | Practical Pork Loin/Chop Cook | Texture Result |
|---|---|---|---|---|
| 54°C | 25 minutes at core | 112 minutes | 2.5 hours (35mm chop) | Very pink, juicy, similar to medium-rare beef |
| 56°C | 6 minutes at core | 62 minutes | 1.5 hours (35mm chop) | Pink, succulent |
| 58°C | 1 minute at core | 32 minutes | 1.25 hours (35mm chop) | Slightly pink, tender |
| 60°C | Instant | 14 minutes | 1 hour (35mm chop) | White-pink, juicy |
| 63°C | Instant | 4.5 minutes | 50 min (35mm chop) | White, traditional but not dry |
| 71°C | Instant | Instant | 40 min (35mm chop) | Gray, dry, fibrous — the old standard |
The 60°C for 1 hour pork chop is a revelation for anyone accustomed to the gray, dry pork of traditional cooking. It is completely safe per USDA guidelines (trichinae killed instantly at 60°C, Salmonella reduced by 7-log in 14 minutes, with total cook time providing a massive safety margin).
Note: these times apply to intact muscle cuts only. Ground pork must be treated differently because pathogens are distributed throughout — use 63°C minimum with full pasteurization time.
Fish and Seafood
Fish proteins denature at lower temperatures than land animal proteins. Sous vide fish is cooked at temperatures that would leave beef essentially raw.
| Protein | Temperature | Time | Texture | Notes |
|---|---|---|---|---|
| Salmon (sashimi-grade) | 40°C | 25-40 min | Barely set, translucent, silky | Essentially warm sashimi |
| Salmon (tender flake) | 46°C | 30-45 min | Opaque, very moist, flakes with slight pressure | The most popular sous vide fish setting |
| Salmon (firm flake) | 52°C | 30-40 min | Firm, opaque, traditional baked salmon texture | Safe for non-sashimi-grade fish |
| Cod / halibut | 52°C | 30-45 min | Flaky, moist, holds shape | Lean fish benefits from the lower temp |
| Shrimp (tender) | 55°C | 30 min | Tender, translucent center | Pre-season with salt 10 min before |
| Shrimp (snappy) | 60°C | 20 min | Firm, snappy bite, fully opaque | Closer to traditional boiled texture |
| Lobster tail | 58°C | 45-60 min | Butter-soft, not rubbery | The transformation that justifies owning a circulator |
| Lobster tail (firm) | 62°C | 30-45 min | Firm, clean bite | Traditional steakhouse texture |
| Scallops | 52°C | 30-40 min | Custard-like center, barely set | Sear in cast iron 45 sec per side after |
Fish does not have collagen conversion concerns — the collagen in fish connective tissue converts to gelatin at 40°C (vs. 68°C for land animals). This is why fish “falls apart” at temperatures that barely warm beef.
Parasites in fish (Anisakis) are killed at 60°C instantly or at -20°C for 7 days (FDA freezing requirement for raw consumption). For sous vide fish below 60°C, use sashimi-grade (previously frozen to FDA specifications) or freeze the fish yourself before cooking.
The Precision Egg
Eggs are the ultimate sous vide demonstration because the white and yolk have different denaturation profiles, and temperature differences of 2°C produce visibly different results.
| Temperature | Time | White Texture | Yolk Texture | Common Name | Use |
|---|---|---|---|---|---|
| 63°C | 45 min | Barely set, pourable in spots | Warm, liquid, bright orange | ”63-degree egg” | Ramen topping, broken over dishes |
| 65°C | 45 min | Soft-set, holds shape but delicate | Thick, jammy, flows slowly | ”Onsen tamago” | Standalone, on toast, salads |
| 68°C | 45 min | Fully set, tender | Fudgy, holds shape when cut, not liquid | Jammy egg | Grain bowls, composed dishes |
| 72°C | 45 min | Firm, rubbery edge beginning | Set but slightly soft center | Soft-boiled equivalent | Traditional soft-boiled replacement |
| 75°C | 45 min | Firm, fully opaque | Fully set, dry, crumbly | Hard-boiled equivalent | Egg salad, deviled eggs |
| 90°C | 12 min | Very firm, rubbery | Dry, chalky, green-gray ring forms | Overcooked | Avoid |
The 63°C egg takes 45 minutes because the egg must reach thermal equilibrium — the shell and air pocket insulate the interior. Shorter times produce unevenly cooked eggs.
Egg whites begin setting at 62°C and are fully firm by 80°C. Yolks begin thickening at 65°C and are fully set by 70°C. The narrow 3°C gap between “yolk begins to set” and “white is barely holding together” is why the 63-65°C range produces textures that no other cooking method can replicate.
Vegetables — Different Rules Apply
Vegetables require higher sous vide temperatures than meat because the target is not protein denaturation but pectin breakdown. Pectin — the polysaccharide glue holding plant cell walls together — does not soften below 83°C, and even then requires extended time.
| Vegetable | Temperature | Time | Result | Why Not Lower? |
|---|---|---|---|---|
| Carrots | 85°C | 60 min | Tender-firm, vibrant color, concentrated sweetness | Below 83°C: pectin remains rigid, carrots stay raw-crunchy |
| Beets | 85°C | 90 min | Tender throughout, intense color, sweet | Dense structure needs time; lower temp = woody |
| Asparagus | 85°C | 12-18 min | Bright green, crisp-tender, no mushiness | Short time prevents overcooked tips |
| Corn on the cob | 85°C | 30 min | Juicy, sweet, snappy kernels | Starch gelatinization requires 85°C+ |
| Butternut squash | 85°C | 45-60 min | Creamy, holds shape | Below 83°C: chalky, undercooked starch |
| Green beans | 85°C | 40 min | Tender, no squeak, vivid green | Blanching achieves similar results faster |
| Potatoes | 85°C | 60-90 min | Creamy throughout, waxy texture | Starch fully gelatinizes at 85°C |
| Fennel | 85°C | 45 min | Silky, sweet, anise flavor concentrated | Raw fennel is fibrous; needs full pectin breakdown |
The practical question: is sous vide vegetables worth it? For most vegetables, blanching or roasting produces equivalent results faster. The genuine sous vide advantage is for vegetables infused with butter, aromatics, or stock in the bag — the sealed environment forces flavor penetration into the vegetable structure in a way open-air cooking cannot.
Vacuum compression also changes texture — the vacuum removes air from intercellular spaces, and when the bag is sealed, atmospheric pressure compresses the cells. This produces a denser, more translucent appearance (visible in watermelon, cucumber, and celery).
Ice Bath Protocol and Safe Cooling
Sous vide food cooked for later use must be cooled rapidly to prevent the 4-60°C danger zone from breeding pathogens. The USDA requires cooling from 57°C to 21°C within 2 hours, and from 21°C to 5°C within an additional 4 hours.
| Cooling Method | Time from 60°C to 3°C (500g portion in bag) | Meets USDA Requirement? | Notes |
|---|---|---|---|
| Ice bath (50% ice, 50% water) | 25-35 minutes | Yes | The standard. Submerge fully, stir water occasionally. |
| Ice bath with salt (10% by weight) | 18-25 minutes | Yes | Salt depresses freezing point to -6°C, faster cooling |
| Refrigerator (direct) | 3-5 hours | No — too slow for portions over 200g | Only acceptable for very thin items (single chicken breast) |
| Freezer (direct) | 45-90 minutes | Borderline | Slow air cooling; ice bath is always faster |
| Blast chiller (-18°C forced air) | 12-18 minutes | Yes | Commercial standard |
The procedure:
- When the cook is complete, transfer the sealed bag directly to an ice bath (do not open the bag)
- The ice-to-water ratio must be at least 1:1 by volume — insufficient ice means the bath warms and cooling stalls
- Stir the ice bath every 5 minutes to prevent a warm water layer forming around the bag
- The food is safe to refrigerate once it reaches 3°C (check with a probe through the bag, or estimate based on time)
- Properly cooled sous vide food in sealed bags stores safely for 3-5 days refrigerated or 6-12 months frozen
Rapid cooling is also a quality issue, not just safety. Slow cooling means the food spends extended time at 50-65°C after you intended to stop cooking — continued enzyme activity at these temperatures degrades texture, producing the mushy quality associated with poorly managed sous vide protocols.
Searing After Sous Vide
Sous vide produces perfectly cooked interiors but no Maillard crust. The post-cook sear must be extremely fast and hot to brown the surface without overcooking the interior.
| Searing Method | Surface Temp | Sear Time (per side) | Internal Temp Rise | Crust Depth |
|---|---|---|---|---|
| Cast iron skillet (preheated 5 min) | 290°C | 45-60 sec | +3-5°C | 1.5mm |
| Carbon steel skillet | 300°C | 40-50 sec | +2-4°C | 1.2mm |
| Torch (MAPP gas) | 1,100°C+ | 30-45 sec | +1-2°C | 0.5mm |
| Deep fry (230°C oil) | 230°C | 30-45 sec | +2-3°C | 0.8mm |
| Charcoal chimney (direct) | 600°C+ | 15-20 sec | +1°C | 0.3mm — but intense flavor |
Before searing, pat the surface completely dry with paper towels. Moisture on the surface must boil off (absorbing energy and time) before Maillard browning can begin. A wet surface adds 15-20 seconds of steaming before any browning occurs — by which point you have overcooked the interior by 5-8°C.
For thick steaks (40mm+), rest the sous vide steak uncovered in the refrigerator for 10 minutes before searing. This cools the outer 5mm, giving you more searing time before the interior overcooks. This technique — sometimes called the “reverse chill” — is the difference between a uniform pink interior with a brown crust and a gray band of overcooked meat beneath the crust.
Quick Reference Summary
| Protein | Rare | Medium-rare | Medium | Well-done | Time range |
|---|---|---|---|---|---|
| Beef steak | 49°C (120°F) | 54°C (129°F) | 60°C (140°F) | 68°C (154°F) | 1-4 hours |
| Pork chop | — | 57°C (135°F) | 60°C (140°F) | 68°C (154°F) | 1-4 hours |
| Chicken breast | — | — | 63°C (146°F) | 74°C (165°F) | 1-4 hours |
| Salmon | 41°C (105°F) | 49°C (120°F) | 54°C (130°F) | 60°C (140°F) | 30-60 min |
| Eggs | — | 63°C (145°F) | 68°C (154°F) | 75°C (167°F) | 45-75 min |
Decision rule: Sous vide is time-temperature pasteurization — lower temperatures require longer cook times to achieve the same pathogen kill. Below 54.4°C (130°F), limit cook time to 4 hours maximum for food safety.
How to apply this
Use the recipe-scaler tool to adjust portions to scale ingredient quantities based on the data above.
Start with the reference tables above to identify the correct parameters for your specific ingredient or technique.
Measure your key variables (temperature, weight, time) before beginning — precision prevents waste.
Check the comparison tables to select the best approach for your situation and equipment.
Adjust quantities using the recipe-scaler when scaling up or down from the tested ratios.
Test with a small batch first, using the exact measurements from the tables before committing to full volume.
Verify your results against the expected outcomes listed in the quick reference section.
Honest Limitations
Sous vide temperatures listed are for internal doneness preferences, not pasteurization guarantees — food safety at temperatures below 54.4°C (130°F) requires consulting pasteurization time tables (Douglas Baldwin’s guide). Bag type matters: silicone bags insulate more than thin sous vide bags. Water circulation is essential for temperature uniformity; stagnant water baths have hot/cold spots. Sous vide cannot brown — a post-sear (cast iron, torch) is necessary for Maillard reaction. Cook times have wide ranges because sous vide is forgiving; however, proteins held too long (>8-12 hours) at tender temperatures become mushy. This guide covers immersion circulator methods; oven-based “sous vide” and DIY setups have less precise temperature control.
